


What is an artifact repository?
An artifact repository is used to store the build artifacts (files created during the build process) from your continuous integration/continuous delivery (CI/CD) pipeline. It allows you to:
Store, version, and share build artifacts in a central location
Retrieve specific versions of artifacts when needed
Automate the deployment of artifacts to different environments
Some common use cases for artifact repositories are:
Storing binaries like JAR files, WAR files, DLLs, etc.
Storing packages for different languages (e.g. Maven, npm, NuGet)
Storing logs and reports from your builds
Storing container images
An artifact repository provides several benefits:
Consistency - All artifacts are stored in a single place, ensuring consistency across environments.
Traceability - Artifacts are versioned and metadata is captured during deployment, enabling fully reproducible builds.
Visibility - Artifact repositories provide search capabilities so you can easily find specific artifacts.
Control - Access controls and policies can be defined to control who can deploy and access artifacts.
Common types of artifact repositories are:
Local - Artifacts are stored on a local file system.
Remote - Artifacts are stored in a remote location and accessed via an API.
Virtual - Combines multiple local and remote repositories to provide a single access point.
Popular artifact repository tools include:
JFrog Artifactory
Azure Artifacts
Google Artifact Registry
AWS Artifact
Nexus Repository from Sonatype
In summary, an artifact repository is an essential part of your CI/CD pipeline. It provides a central place to store and manage the build artifacts that your pipeline produces, enabling automation, visibility, and control over your deployment processes.
What is an artifact repository manager?
An artifact repository manager is software for storing and managing build artifacts and software packages. It allows developers to share artifacts and dependencies between development teams and automate the software build process.
Some key characteristics of artifact repository managers are:
They store artifacts in a centralized location, making them accessible to all development teams.
They provide version control for artifacts, allowing teams to retrieve specific versions.
They support different package types like Maven, npm, NuGet, etc.
They implement access control and authentication to manage who can access and deploy artifacts.
They often provide web interfaces for browsing, searching and deploying artifacts.
Popular artifact repository managers include:
Artipie
Nexus Repository from Sonatype
JFrog Artifactory
Strongbox
Reposilite
As seen from the GitHub topics page, there are many public repositories related to artifact repository managers, written in various languages like Java, Go, Python, etc.
Some repositories provide:
Docker images to run artifact repository managers in containers
Kubernetes configurations to deploy artifact repositories on Kubernetes
Implementations of artifact repository managers from scratch
In summary, artifact repository managers provide a centralized place for development teams to store, share and manage the binaries and packages required to build and deploy their software.
About Nexus
Nexus is an artifact repository manager developed by Sonatype. It allows you to store, proxy and manage build artifacts and software packages.
Some key features of Nexus Repository include:
Universal Repository Support - Nexus supports all major package formats like Maven, npm, NuGet, PyPI, RubyGems etc. This allows developers to use their preferred package format.
Private Hosted Repositories - Nexus allows you to create and manage private hosted repositories for your organization. These repositories can store internal artifacts.
On-demand Proxying - Nexus can proxy external public repositories. This reduces the load on external repositories and caches artifacts locally.
Global Component Search - Nexus provides a global search functionality to search for artifacts across all repositories. This makes it easier for developers to find the packages they need.
Role-based Access Controls - Nexus allows you to define fine-grained roles and permissions to control who can access and deploy artifacts.
Automated Cleanup Policies - Nexus can automatically remove unused artifacts to optimize storage usage.
High Availability - Nexus supports features like content replication, resilient failover, and multi-node deployments to provide high availability.
Nexus is available in two editions - Nexus Repository OSS (free, open source) and Nexus Repository Pro (paid, with additional enterprise features).
Some of the benefits of using Nexus as your artifact repository include:
Centralizing all artifacts in a single place
Caching external artifacts to improve build performance
Providing visibility into all artifacts used in your organization
Implementing control over who can deploy and access artifacts
Integrating with build tools and CI/CD systems
In summary, Nexus Repository from Sonatype is a popular artifact repository manager that can accelerate your DevOps pipelines by providing a centralized place to store, proxy and manage your build artifacts and software packages.
Repositories Format
Helm: Kubernetes
Maven: Java
npm: Javascript
NuGet: Microsoft .NET
PyPI: python
Docker: Containers
Features of Repository Manager:
Integrate with LDAP
Flexible and powerful REST API for integration with other tools
backup and storage
multi-format support ( different file types - zip , tar , docker etc.)
metadata tagging (labelling and tagging artifacts)
cleanup policies
search functionality
user token support for system user authentication
Installation
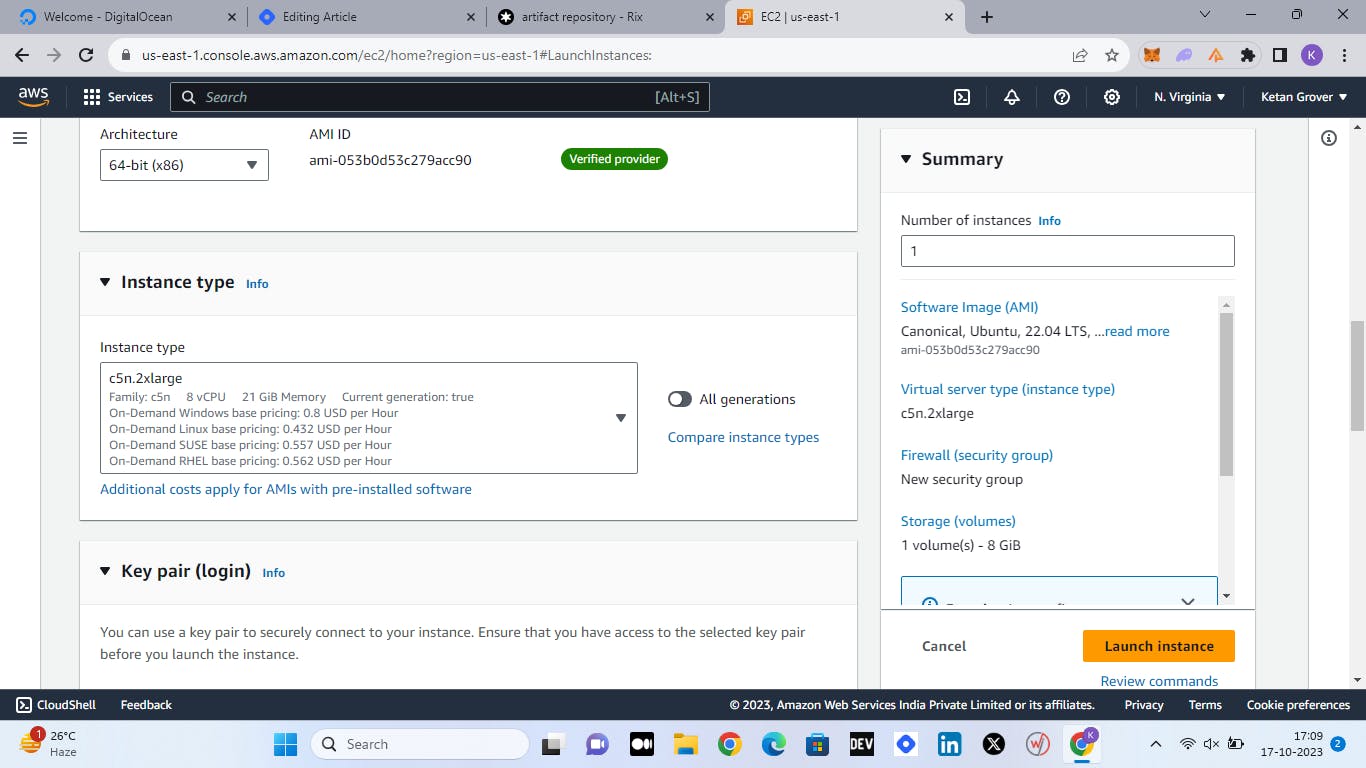
Creating EC2 Instance
Firstly we need to create an EC2 Instance for Nexus.
Log in to your AWS account.
Now, Navigate to the EC2 instance and then click "Launch Instance".
Name: nexus-demo
Number of Instances: 1
Application and OS image: Ubuntu
Instance type: c5n.2x.large (8 vCPU)
Key pair: create a new one or use the existing one
Keep the rest of the things as default and click on "Launch Instance"
Now, we will SSH to our Jenkins Instance using the command:-
ssh -i {path of pem file} ubuntu@{Public IPv4 address}
Installing Java-JDK
Before installing Nexus on your instance we need to install Java 8th version
sudo apt update
sudo yum install java-1.8.0-openjdk.x86_64 -y
Installing Nexus
Create a directory named app and cd into the directory.
sudo mkdir /app && cd /app
Download the latest Nexus. You can get the latest download links for Nexus from here.
sudo wget -O nexus.tar.gz https://download.sonatype.com/nexus/3/latest-unix.tar.gz
Untar the Downloaded file.
sudo tar -xvf nexus.tar.gz
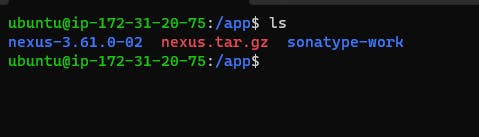
Hereafter untarring the files you will see two folders:
Nexus folder (contains Runtime and application on Nexus)
Sonatype folder (contains own config for Nexus and data)
Sonartype-work folder contains
subdirectories depending on your Nexus configuration
The IP address that accessed Nexus
Logs of Nexus App
Your uploaded files and metadata
Rename the untared file to nexus
sudo mv nexus-3* nexus
As a good security practice, it is not advised to run a nexus service with root privileges. To create a new user named nexus to run the nexus service.
sudo adduser nexus
Change the ownership of nexus files and nexus data directory to nexus user.
sudo chown -R nexus:nexus /app/nexus
sudo chown -R nexus:nexus /app/sonatype-work
Now, we will set nexus configuration so that it can run as a nexus user:
vim /app/nexus/bin/nexus.rc
Paste the code inside the file:
run_as_user="nexus"
save the file using wq!
now we can run the service
su - nexus
Now to start nexus services use the command:
/app/nexus/bin/nexus start
check if it is running or not:
ps aux | grep nexus
Now, to start nexus server we need to add some inbound rules inside our cluster
Setting Security Groups
By default, SonarQube will not be accessible to the external world due to the inbound traffic restriction by AWS. Open port 8081 in the inbound traffic rules as shown below.
EC2 > Instances > Click on
In the bottom tabs -> Click on Security
Security groups
Add inbound traffic rules as shown in the image (you can just allow TCP 8081 as well, in my case, I allowed
All traffic).
After that copy your your public IP address and paste it on your browser using port:
http://{Public IPv4 address}/8081
Congrats, You will be redirected to Nexus Dashboard.
That's a wrap..........................